Warum eine Investition in einen professionellen Dating-Profilfotografen sich lohnt | Steigern Sie Ihren Online-Dating-Erfolg">
Set concrete deliverables: request 50–80 frames taken during the photoshoot and 5–8 retouched finals. Arrange the session to produce one main face shot, one full-body, two lifestyle frames and one close crop – this mix tends to spark the most interest in message threads. Ask the specialist to provide on-set guidance for posture and micro‑expressions so poses feel approachable rather than overly staged.
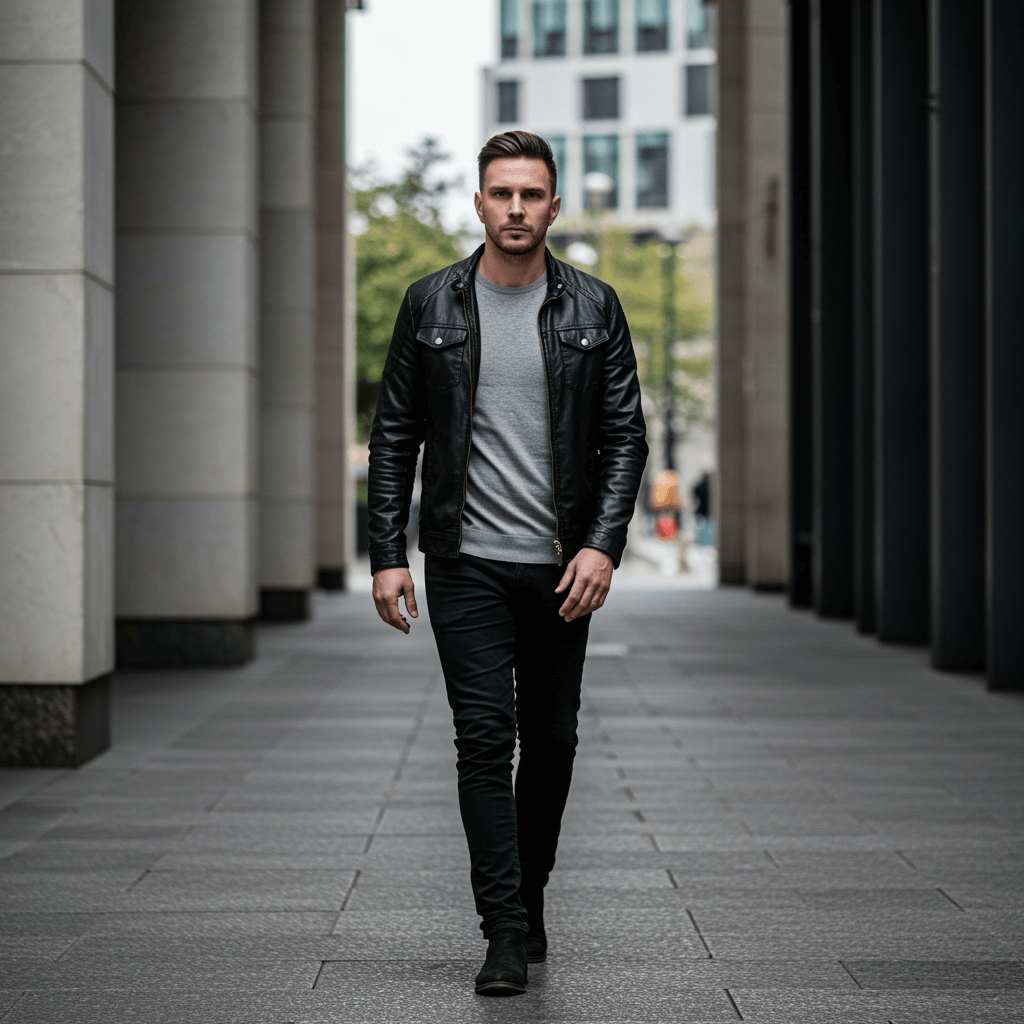
Wardrobe and visual identity matter: bring three outfits (casual, smart-casual, activity-based), coordinate colors to match a chosen personal brand, and plan two indoor plus one outdoor locations to showcase different moods. Prefer minimal edits and light color correction; heavy filters reduce authenticity and lower the perceived sincerity of expressions. Include at least one prop or activity that would showcase a hobby to create immediate conversational hooks for future dates.
Timing and process: update images every 6–12 months or after major changes. Prepare 3–5 practical questions for the session – for example, when to smile, when to go candid, and what form of body language reads as confident but approachable. Test crops in square and 4:5 forms on the spot so final files are ready to upload. If working with a specialist such as saskia, request sample location lists (café, riverside park, bookstore) and a shot list to be taken in sequence.
Measure outcomes: track impressions, matches and first‑message response rate for 30 days post‑upload and compare to prior performance. If interest does not rise, iterate by swapping the main image or adjusting captions. Most clients believe a targeted shoot will provide clearer signals; be sure to keep at least one compelling, candid frame that lets everyone see a natural smile and honest expressions.
Why Investing in a Professional Dating Profile Photographer Is Worth It – Boost Your Online Dating Success; Look Your Best

Start with a single clear action: book a 45–60 minute session and replace the three weakest images on your account–one close headshot that highlights the Augen, one waist-up that shows style, and one full-body plus an activity shot; making those swaps within two weeks yields the fastest measurable change.
Concrete impact metrics to track: swap images and compare message rate, reach and matches on different apps over 7–14 days. A front-facing headshot that shows eye contact and an open expression creates a stronger first impression and draws attention during swiping, so you’ll see result differences instantly rather than after months of passive posting.
Work plan: research three local studios, perhaps include a session in angeles if local rates fit your budget; compare portfolios and client feedback to find a style that differentiates you from others. That research speeds decisions, reduces effort on retakes, and because the session includes brief coaching on posture and expression, the final edits will require less work and leave you with images ready to post to social or match apps.
Praktische Checkliste: benefits include higher potential matches and clearer personality signal. Ensure you have: a front headshot, a casual full-body, an activity image, and one candid that shows eyes and smile. Either natural light or soft studio light will work; theres no perfect formula, but testing two similar sets lets you find which images differentiate you from others. In terms of timing, post the new set on a low-activity day, then monitor clicks and messages for 14 days. The secret: prioritize authenticity, consistent style, and captions that guide viewers into conversation–this combination increases reach and engagement more than swapping dozens of similar photos yourself.
Maximize Online Dating Success with a Professional Profile Photographer
Book a 60–90 minute session with local photographers and capture 10–12 usable shots: 3 tight faces/headshots, 4 waist-up, 3 full-body, and 2 candid action frames–include one night scene and one city-cafe environment to show lifestyle variety.
Run a controlled experiment: create two selections of five images each and rotate them for 14 days while logging impressions, messages, and response rate. A simple report template: date range, selection A vs B, impressions per 1,000, messages, replies, and new contacts. That data gives a clear signal about what images generate the most connection and potential conversations.
Wardrobe and angles: pick three outfits that highlight strong features (one neutral, one color-pop, one textured layer). Use five distinct angles–eye-level, slightly above, three-quarter, wide full-body, and movement candid–to differentiate from popular, static shots. Make sure lighting lets skin tones read naturally and that professionally edited files retain realistic texture.
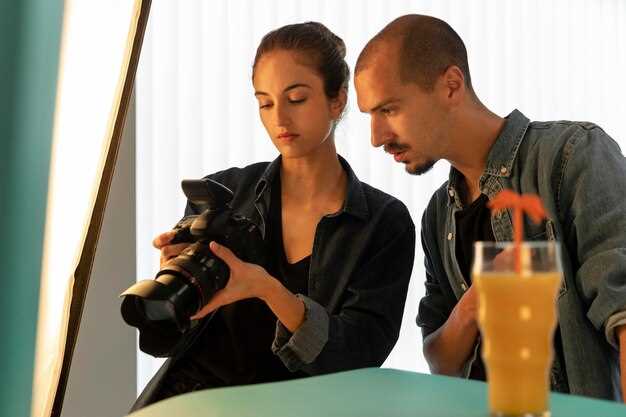
Session logistics: request a short consultation before the shoot to align on goals, locations, and shot list. Ask photographers for a digital gallery, basic retouching, and credit/licence terms up front so anyone you contact can reuse images without legal confusion. Leave time for the photographer to test light at golden hour and a quick night take for contrast.
| Shot Type | Count | Zweck | Upload / Rotate |
|---|---|---|---|
| Tight faces | 3 | Conveys trust, eye contact, first impression | Primary; swap every 7–14 days |
| Waist-up & features | 4 | Shows style, grooming, approachable posture | Alternate weekly |
| Full-body | 3 | Context about build and movement | Keep at least one live |
| Candid / action | 2 | Signals authenticity and shared interests | Use to test engagement |
| Night / city | 1–2 | Differentiates profile with mood and social life | Rotate monthly |
What to track and who benefits: record impressions, messages, replies, and new connections per image set; this report shows which shots deliver the most response and helps prioritize what to book next. Guys often underestimate candid frames; they consistently give higher engagement. Make sure you leave time after the shoot to review selection with the photographer and export correctly cropped versions for each social app.
What you get: deliverables, formats, and turnaround expectations
Book a 90-minute session that delivers 8 fully retouched hero images plus 16 optimized variants for phones and apps; you will receive initial proof images within 24–48 hours and final retouching completed in 5–7 business days.
- Exact deliverables:
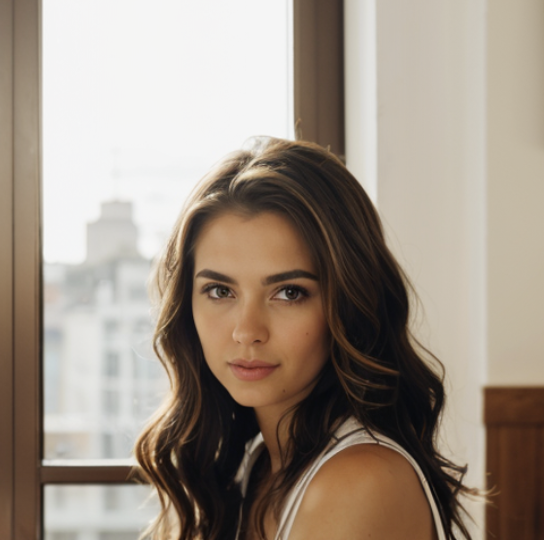
- 8 fully retouched high-resolution JPGs (desktop/web-ready) – the primary images that convey a natural, approachable smile and stronger first impressions.
- 16 lightly edited variants (different crops, exposure alternatives, color temperature) for quick A/B testing and post scheduling.
- 1 web gallery link to share selects; downloadable ZIP containing both full-res and phone-optimized files.
- File formats and crops:
- High-res JPG (3000–4000 px long edge), sRGB, for full-size use and prints.
- Web JPGs resized and compressed (1200 px long edge) for fast loading.
- Square (1:1), portrait (4:5), and tall crop (9:16) exported so you never have to guess which format an app requires.
- Export presets labeled for common app posts and phones to make upload simple.
- Turnaround expectations:
- Proofs posted to a private gallery within 24–48 hours – you can tag images you want retouched.
- Standard retouching delivered in 5–7 business days after final selects; express 48–72 hour delivery available for an additional fee.
- Minor re-edits (skin tone, spot removal) included once; additional heavy retouching or body-altering edits carry extra charges and will be quoted upfront.
- Licensing and credits:
- Personal use license included for posting and direct messages; commercial use requires written permission and credit to photographers when their portfolio uses your images.
- If you want portfolio removal, request it in writing; credit terms and fees are specified in the contract.
- What to expect in-session and after:
- Guidance on wardrobe, poses, and expression so shots take less time and look more natural – this guidance lets you find an authentic, memorable smile that stands out.
- Bring one outfit per look; bring accessories and an animal if you want pet shots (extra time and safety measures apply).
- Photographers will shoot a mix of candid moments and directed frames so you can test whether a relaxed or more formal approach increases matches.
- Editing philosophy and filters:
- Natural retouching that reduces distractions, evens skin tone, removes temporary blemishes, and preserves skin texture – never heavy smoothing that looks artificial.
- Files are delivered without app-style filters; a separate set with subtle stylistic color grades is available so you can compare what shows best in feeds.
- Research shows a genuine, approachable expression probably increases positive impressions and engagement; the gallery will include both smile-forward and contemplative frames to test which performs better.
- Practical tips to get the result you want:
- Take 2–3 date-appropriate outfits that reflect different aspects of your life so the final set conveys depth about who you are.
- Decide beforehand whether you want action shots (walking, coffee, with an animal) or clean headshots; mixing both gives better post options.
- Post 1 hero image and rotate secondary images weekly – avoid heavy filters and captions that distract from the image itself.
- How this increases matches and impressions:
Clear, well-cropped images that show face, smile, and posture convey approachability and confidence; that combination tends to increase matches and better-quality conversations. Use the provided formats to A/B test which hero image gets the best result over a two-week window and adjust posting times based on early engagement data to find what shows highest response.
Lighting, composition, and posing that improve first impressions
Place the subject at a 30–45° angle to the main light so side lighting enhances cheekbones and creates a natural catchlight in the eye; this single adjustment immediately makes images more captivating.
- Lens and framing: for headshots use 50–85mm equivalent, aperture f/1.8–f/4; crop at 4:5 for profile galleries and 1:1 for thumbnails. Wide lenses (24–35mm) work only for full-body action shots, otherwise they distort facial features.
- Distance and compression: keep 5–8 ft between camera and subject for flattering compression; closer than 3 ft on wide glass enlarges the nose and flattens the face.
- Shutter/ISO: outdoors in golden-hour aim 1/125–1/500s at ISO 100–400; in shade raise ISO but keep below 800 to avoid texture loss for retouching.
Heres a checklist for light setups that convert into better first impressions:
- Golden hour outdoors: 30 minutes before sunset or 30 after sunrise; backlight at low angle plus a 1–2 stop reflector fill.
- Open shade: place subject under a tree or north-facing building side to avoid harsh shadows and keep color consistent.
- Window light indoors: position subject perpendicular to the window; add a white bounce on the shadow side to soften contrast.
- Posing specifics: shift weight to the back foot, shoulders at a 10–15° tilt, chin lowered 5°; lean slightly toward the camera by 5–10° to appear engaged.
- Hands and activity: include a simple activity (holding a coffee cup, adjusting a jacket) to break cookie-cutter static poses and express personality without forcing a smile.
- Expressions: practice three expressions–neutral with soft eyes, small smile with teeth hidden, wide smile with teeth–so a mix of moods appears across shots.
Technical tips for getting more from taken frames:
- Shoot RAW to retain highlight and shadow detail for minimal retouching; avoid heavy smoothing–preserve skin texture.
- Use spot metering on the face to ensure correct exposure of key features; underexpose by 0.3–0.7 stops in high-contrast scenes and recover in post.
- Tether or preview at 100% to check focus on the eyes; a single missed focus destroys the whole image.
Location choices that provide the best return:
- Outdoors: quiet park paths, textured brick walls, or waterfronts for natural color and depth.
- Indoors: a well-lit café corner, minimalist apartment living room, or studio with a soft box and reflector.
- Always scan backgrounds for repeating patterns or poles that appear to intersect the head or hands.
Practical steps you can take yourself to save money yet get pro-level results:
- Practice poses in front of a mirror to learn which angles express you best; record brief video to review micro-expressions.
- Buy a portable reflector (~$20–40) and a basic tripod (~$30–60); getting these often saves 100–300 dollars versus reshoots.
- Provide simple wardrobe swaps and avoid tight logos; neutral tones and one accent color keep attention on the face and eyes.
Retouching and finishing: keep edits focused–remove blemishes, adjust skin tone, sharpen eyes, and dodge/burn subtly; less retouching makes images feel authentic and gives credit to lighting and pose rather than heavy editing.
Composition rules to follow: lead the eye with a 2/3 subject placement, leave breathing room toward the gaze, and use shallow depth to separate subject from background; this makes thumbnails more clickable and helps them express potential without overstatement.
Session prep: outfits, locations, and mood boards to match your dating goals
Bring exactly three outfits: 1) a neutral headshot kit (solid navy, charcoal or cream) for close-ups, 2) a casual approachable set (soft textures, one layer) to attract relaxed connections, 3) a polished evening look (structured jacket or dress) to increase perceived effort; change time per outfit: 8–12 minutes, pack lint roller, safety pins, and a spare shirt in case of spills so everyone leaves prepared.
Choose 2–3 locations that map to goals: urban brick or textured wall for high-impact headshot contrasts, park or waterfront at golden hour for warm positive stories and candid poses, cafe front window for talking and lifestyle post content. Permit fees vary: free public spots, private venues $50–300; pay with credit or card, expect $0–300+ in dollars depending on access and parking.
Create three mood boards (12 images each): label them HEADSHOT, LIFESTYLE, ACTION. Include exact color swatches, 6 preferred poses, and 4 facial expressions per board. Save screenshots to your smartphone and share before the session so once everyone views the same visuals theyll reproduce the whole plan and reduce on-set guessing.
Prepare a 6-shot checklist: 1 close headshot (eyes to camera, slight smile), 2 mid-body (hands visible, one in pocket), 1 full-body walking (natural stride), 1 candid laughing (look off-camera), 1 active hobby frame. Use rule: front shoulder ahead of back shoulder by 10–20 degrees to catch light; theyre more approachable when chin is lowered 2–4 degrees and torso angled 10–20 degrees toward the lens.
Ressourcen realistisch zuweisen: einfache Smartphone-Tests können anfängliche Posts verbessern, aber eine gebuchte Session erhöht den Einfluss durch die Erstellung vielfältiger, hochwertiger Aufnahmen, die für Stories und den Hauptfeed bereit sind. Wenn das Budget knapp ist, legen Sie $150–500 zurück; Ausgaben für eine einzelne Session können mehr Matches und Verbindungen generieren als mehrere Versuche mit geringem Aufwand. Achten Sie auf das Framing, geben Sie klare Anweisungen zu Posen und lassen Sie Saskia oder einen anderen vertrauenswürdigen Freund die Auswahl überprüfen, damit die Leute eine positive, authentische Version von sich selbst sehen – diese Konsistenz wird Aufmerksamkeit erregen und Konversationen schneller verbessern als zufällige Schnappschüsse jemals könnten.
Budget, Zeitplan und Wert: Planung vor der Buchung
Buchen Sie einen 90-minütigen Porträtsitzung mit 3 Outfitwechseln, budgetieren Sie $300–$600, erwarten Sie 20–40 Abzüge und 5–8 retuschierte Bilder; Abzüge innerhalb von 48–72 Stunden, Enddateien innerhalb von 5–7 Werktagen und Zahlung aufgeteilt in 30% Anzahlung/70% bei Lieferung, damit das Shooting ohne kurzfristige Absagen durchgeführt werden kann.
Schritt-Checkliste: 1) Legen Sie ein festes Budget fest und listen Sie die primären Anwendungsfälle (Apps, Porträts, Social Media) auf, damit Sie Retuschen und Rechte priorisieren können; 2) Planen Sie 2–4 Wochen im Voraus, wenn Sie beschäftigt sind und Wochenendtermine wünschen; 3) Planen Sie 2–3 Outfits, die verschiedene Aspekte Ihres Lebens zeigen – lässig, schick und ein Outfit, das Ihre Persönlichkeit oder Essenz offenbart; 4) Entscheiden Sie, ob Sie Familie oder Freunde für ein oder zwei Frames einbeziehen möchten; 5) Fordern Sie mindestens einen Probedruck vor vollständiger Retusche und eine klare Möglichkeit für 2–3 kleinere Änderungen an.
Bitten Sie das Studio, Ihnen eine schriftliche Liste der Lieferumfänge zukommen zu lassen: Anzahl der Endbilder, Dateigrößen, erlaubte Verwendungszwecke, Gebühren für zusätzliche Bilder und Strafgebühren bei Nichteinhaltung der Fristen. Ein realistisches Zeitlinienbeispiel: Saskia zahlte $450, buchte einen Samstagstermin um 10:00 Uhr, brachte 4 Outfits und eine Freundin mit, erhielt 35 Vorabversionen innerhalb von 48 Stunden, wählte 6 Endbilder aus und erhielt diese innerhalb von 4 Tagen zurück; ihre anfängliche Antwortrate stieg merklich an, und ihre Übereinstimmungsrate verbesserte sich innerhalb von zwei Wochen um einen messbaren Prozentsatz.
Wertberechnungen und Vorteile: Kosten pro nutzbarem Bild = Gesamtgebühr ÷ finale Bilder (z. B. $450 ÷ 6 = $75). Klare Headshots und Lifestyle-Aufnahmen aus mehreren Posen und Winkeln bieten eine ausgewogene Darstellung ihres Aussehens und ihrer Persönlichkeit und schaffen positive erste Eindrücke, die Interessenten leicht ansprechen werden. Wenn es richtig gemacht wird, spart die Investition Zeit beim Wischen und schafft eine konsistente persönliche Marke über alle Plattformen hinweg; überbuchen Sie einen 20%-Puffer für die Planung und bewahren Sie Kopien der Roh-Proofs als Beweis für Bearbeitungen und ursprüngliche Darstellung auf, falls Streitigkeiten entstehen.
 4 deutliche Anzeichen, dass es Zeit ist, weiterzuziehen – Wie man loslässt und neu anfängt">
 Smarte Paare – Geheimnisse für starke, moderne Beziehungen">
 Die 2-2-2-Regel – Die Geheimformel für eine stärkere Beziehung">
 Sabrina Carpenters heißeste Songtexte – Eine eingehende Analyse von gewagten Zeilen wie Man’s Best Friend, Light Rods Back Doors und Never Getting Laid">
 Eine Frau sein, die Männer nach einem Date fragt – Vor- und Nachteile">